QuickFile is a wage reporting program that can be downloaded for free. Employers with any number of employees can use QuickFile. Agents and payroll providers representing multiple clients can also use QuickFile.
QuickFile transfers wage data in the following formats:
- Interstate Conference of Employment Security Agencies (ICESA)
- MMREF-1
- Comma-delimited and fixed-length formats
Once downloaded and installed on your computer, QuickFile analyzes a file created by the user's payroll program. It validates the format, identifies potential problems, and allows you to make corrections before transmission. After the payroll file is validated, you transmit the report to the Texas Workforce Commission (TWC) online.
QuickFile does not calculate taxable wages. Your payroll program must do the calculation.
You may submit current quarter reports the first day of the filing month. Reports are processed 24 hours a day.
You may submit late and prior quarter reports anytime. QuickFile will accept up to 12 quarters of data. This includes the most recently completed quarter plus the preceding 11 quarters.
QuickFile User's Guide
These sections provide detailed information for installing and using QuickFile.
Download QuickFile or submit a Contact Request to order QuickFile on CD. From the Employer menu, select:
- Reason for Contact: Employer Tax Account Actions/Issues
- Issue that you are having: QuickFile Support Requests
Requests are fulfilled within 1-2 business days of receipt. For additional information, visit the QuickFile Download Instruction section. Register for access to Unemployment Tax Services. Registration is quick and simple. You will create a User ID and password during registration. Use your User ID and password to access the online system. To create a User ID and password, visit Unemployment Tax Services and select the Sign Up for a TWC Internet User ID link. See End User License Agreement for QuickFile section.
- Minimum of 24 MB of RAM, PC or compatible, 2 MB free disk space, Internet connection
- Windows 98, 2000, XP, Vista, or Windows 7 operating systems or later
- Recommended browsers are Chrome, Edge, Firefox, or Safari. Click on the respective link to download the latest free version.
- Payroll reports must be produced in one of the following formats:
- ICESA Format
- MMREF-1 Format
- Comma-delimited and fixed-length formats
Some payroll programs can create a spreadsheet version of the payroll information which can then be converted by spreadsheet programs into comma-delimited or ("*.csv") files. Contact your payroll software company to find out if your system can produce payroll reports in one of these formats. - Submit a Contact Request for ICESA and MMREF-1 format specifications. From the Employer menu, select:
- Reason for Contact: Employer Tax Account Actions/Issues
- Issue that you are having: QuickFile Support Requests
The following information is helpful to entities who report for multiple employer accounts.
- The person uploading payroll data through QuickFile must have a User ID on file on UTS.
- The User ID must have permission to file reports for all employer accounts within the file. If the User ID does not have the Manage Wage Report permission for all employer tax accounts, QuickFile will reject the entire file. You can check your permissions by logging on to Unemployment Tax Services and selecting the User Admin tab.
QuickFile does not support allocating a single remittance to multiple accounts. However, QuickFile provides a separate remittance form for each employer account. The remittance form can be provided to the employer after filing the quarterly wage reports. The employer may then use the payment option that best suits their business needs.
Uninstall any QuickFile versions prior to the current version 5.5.8. This is required for successful installation.
Installation Instructions
Download and run setup wizard or save the QuickFile setup program to a location on your computer hard drive, such as your desktop.
File transmissions uploaded via QuickFile are encrypted. We support multiple levels of encryption to protect your data. Data encryption scrambles the information sent over the Internet so only the computer it is intended for can read it. Data is transmitted to TWC using Hypertext Transfer Protocol Secure (HTTPS).
Potential Installation Issues
- Other installation programs can run when you try to install QuickFile. Sometimes a program will leave behind a "Setup.exe" file in your download or temporary directory. If present, delete the setup.exe file and rerun the QuickFile install program.
- Delete all temporary files and cookies as an extra precaution before you download QuickFile. Temporary files and cookies can hang up the installation of QuickFile.
- QuickFile is not certified to run on non-Windows machines. The program uses certain calls to Dynamic Link Libraries (DLLs) which most likely will not execute properly on a non-Windows operating system. Some versions of the Windows emulator might allow the program to run. This is not a supported configuration. So, we cannot assist you if you encounter any problems.
- When starting QuickFile, the message "not running the most recent version" may display. This may be a firewall issue on your computer. Change your firewall and anti-virus software settings. This should allow the QuickFile program to download files from our read–only server. Add https://www.twc.texas.gov as a trusted site to your firewall and anti–virus software.
Before selecting your file type, you must locate your payroll file. You must know the name and location (the drive and folder) of the payroll file you want to import into QuickFile.
Locate the Payroll File
Your original file name must not be longer than 45 characters, including the extension. It must not contain any commas, tildes (~), quotes or apostrophes. We suggest using only letters, numbers and underscores, for example: MyCompany_TWC_Q2_2007.ICE.
- Once QuickFile is installed, select the Start button, access QuickFile 5 from the Programs menu. A desktop icon is created for future filings.
- Select the circular radio button for your file format (ICESA, MMREF -1, Other Text Format), then select the Find and Select File button. By selecting ICESA or MMREF-1, an open dialog box will appear on your screen. If you select "Other Text Format" you must complete additional screens before you reach the open dialog box (see Other Text Format - Conversion Menu below).
- Select the directory containing your payroll file. Select the down arrow on the right of the 'Look In:' box. A drop-down directory menu appears. Navigate to the folder containing your payroll file for TWC.
- Select the correct file and select Open. Your file is selected, and you return to the QuickFile program.
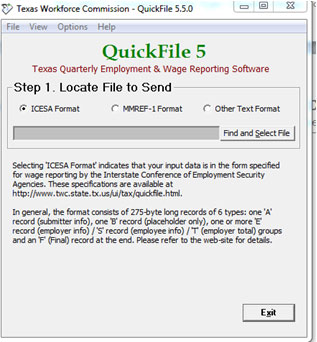
ICESA Format
QuickFile submits data to TWC in the Interstate Conference of Employment Security Agencies (ICESA) format. However, QuickFile can obtain this information from employer data that is in the ICESA, MMREF-1, or Other Text formats.
ICESA format indicates the input data is in the format specified for wage reporting by the Interstate Conference of Employment Security Agencies. Submit a Contact Request for ICESA format specifications. From the Employer menu, select:
- Reason for Contact: Employer Tax Account Actions/Issues
- Issue that you are having: QuickFile Support Requests
This format consists of a 275-byte-long record with 6 different types of information.
- A Record: Submitter Information. Federal Employer Identification Number (FEIN) required
- B Record: Placeholder only - required but info not used
- E Record: Employer information (One E record for each employer-quarter)
- S Record: Employee Salary information (one record for each employee of the above employer for the quarter)
- T Record: Employer Total information (ends the E-record group)
- F Record: Final record at the end
A submission with multiple employers would have the records arranged like this:
- A Record
- B Record
- E Record (info about first employer)
- S Record (for first E record employer)
- T Record (totals for first employer)
- E Record (info about second employer)
- S Record (for second E record employer)
- T Record (totals for second employer)
- F Record
MMREF-1 Format
MMREF-1 format indicates the input data is in the form specified for wage reporting by the Social Security Administration. Submit a Contact Request for MMREF-1 format specifications. From the Employer menu, select:
- Reason for Contact: Employer Tax Account Actions/Issues
- Issue that you are having: QuickFile Support Requests
The MMREF-1 format consists of 512-byte-long records of several types of information. The QuickFile program expects the following records. Additional record types are ignored by QuickFile.
- RA Record: Submitter information
- RE Record: Employer information (One RE record for each employer and quarter)
- RS Record: Employee information for this employer for the indicated quarter
- RF Record: Final record at the end (Optional)
A submission with multiple employers would have the records arranged like this:
- RA record (first record)
- RE record
- RS records
- RE record
- RS records
- RF record (last record)
Additional information is required by TWC that is not defined under the standard MMREF-1 format.
This information includes:
RE record:
- Columns 300-308 = TWC Acct Number (9 numeric digits, no spaces or dashes)
- Columns 309-314 = Quarter-Year as MMYYYY (where MM = last month of the quarter, i.e., 03, 06, 09 or 12)
RS
- Columns 248-256 = TWC Acct Number (9 numeric digits, no spaces or dashes)
- Columns 338-340 = Hours Worked in Quarter (3 numeric digits with leading 0s)
- Columns 341-343 = Numeric county code of the Texas county where the employee worked
For employers with multiple worksites, the following information is requested for each employee:
RS record:
- Columns 345-350 = NAICS code. The 6-digit Industry Classification code that best describes the worksite where the employee is assigned. This information is available on the Department of Labor - Bureau of Labor Statistics website.
- Columns 352-361 = Establishment ID, also known as the Unit/Division/Location/Plant Code. This ID must be registered with the Multiple Worksite Report office of TWC’s Labor Market and Career Information Division.
- Columns 363-367 = An optional numeric Unit Number that also associates this employee with a specific worksite. This code will appear on unemployment claim notices mailed to you, allowing you to route it to the proper person in your company. You may assign this number yourself. We provide this as an option for your benefit.
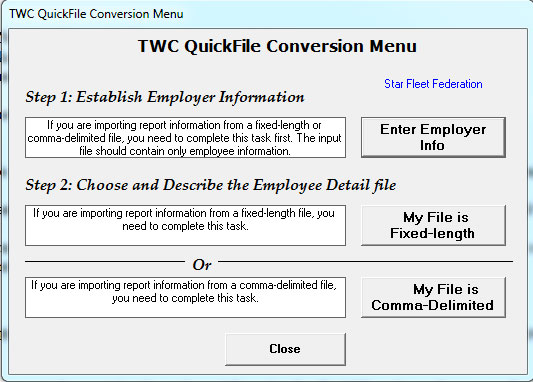
Other Text Format – Conversion Menu
The Other Text Format option supports two file formats. These screens are where you tell us about the format of the payroll information file by linking your data to our required fields.
The data file used by this option is expected to contain only employee information (i.e. Social Security number, name of employee and total wages) or have a unique field value that identifies a row as an employee record.
Currently we are only able to process one quarter's wages for one employer account at a time.
You must complete "Step 1: Establish Employer Information" on the TWC QuickFile Conversion Menu before the system will process this data file.
This information is required for the data to be posted correctly to the TWC system. Once entered, you should not need to change the submitter information.
Help messages are available to assist as you are entering this information. Information required includes the employer's name and address, FEIN, TWC employer ID number, reporting quarter, tax rate, total and taxable wages, and the county code of the county in Texas in which most of the employees work. There is also an indicator that provides the ability to file a "No workers/No wages" report. The reporting quarter and year, tax rate, total and taxable wage fields must be reviewed and updated quarterly.
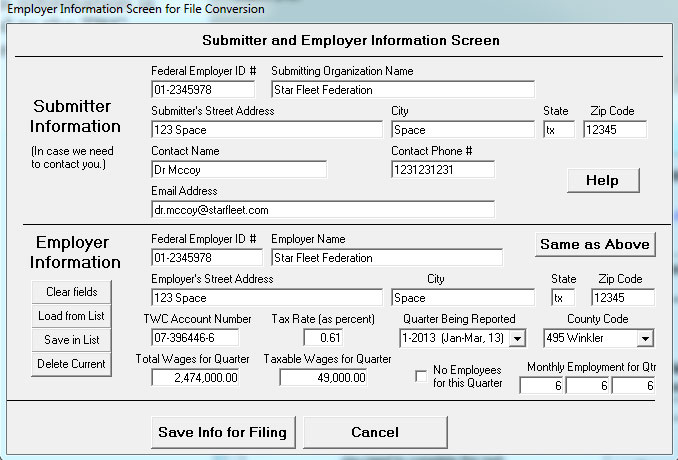
Select the Save Info for Filing button before you move to the next step: defining the fixed-length or comma-delimited data file.
Fixed-Length Files
A Fixed-length file is one where the information is always in the same place on each row. Text is not enclosed in quotes and numbers must be the same length on each row, including decimal points and spaces. Rows of a fixed-length file might look like this:
| Employee Name | 00001000.00 | 00000500.00 | 012345678 | 000000000 |
|---|---|---|---|---|
| Another Employee | 00002000.00 | 00001500.00 | 012345678 | 000000000 |
Fixed-length file format considerations:
- If writing from a Unix system, use the American Standard Code for Information Interchange (ASCII) option when saving the data to ensure the proper line-ending format.
- If exporting from an Extended Binary Coded Decimal Interchange Code (EBCDIC) system, be sure to use the ASCII/CRLF option to ensure proper conversion to the PC standard format and ensure the correct line-endings.
- Make sure that the areas between fields are blank-filled and that everything lines up.
- Add spaces if necessary to ensure a constant line length.
The QuickFile Fixed-Length Import Program is used for fixed-position files. To begin, select the data file and press Start. The program then attempts to read the selected file and displays the first 10 rows in the File View window at the top of the screen.
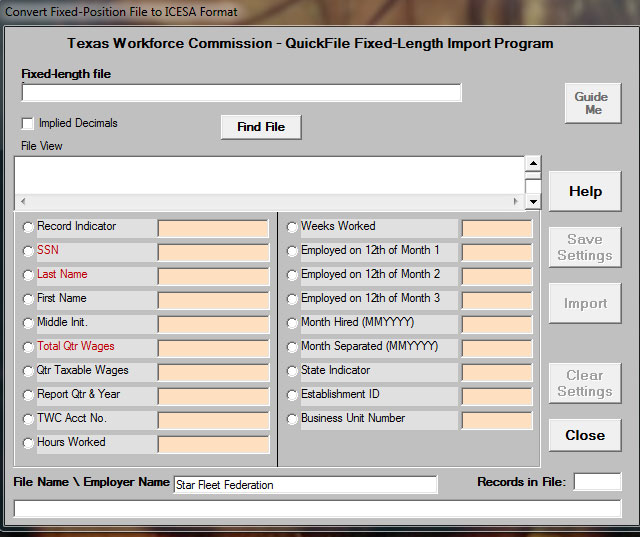
To define the file layout:
- Define the file layout.
- Select the circular radio button at the left of the desired field definition.
- Highlight the corresponding value on the displayed row. You can move to other rows if you like. Highlight from left-to-right for best results. You may repeat until satisfied.
- Select Save Settings when you are finished.
- Enter the starting position and length of each field in the screen’s top right boxes.
- Select the circular radio button to the left of the desired field definition.
- Enter the starting location at the upper right in the Starting Location box. Enter the length of the field in the Length box.
- Repeat either process until all fields are defined.
- You must start over if you make an error. Select the Clear Settings button to erase the assignments and reset the screen.
- Press the Save Settings button when you are finished.
- Press the Import button to convert your data and begin the validation process. Refer to the Validating the File section.
Comma-Delimited Files
A comma-delimited file has units of information (fields) separated by commas. This is also known as a comma-separated-variable or comma-separated-value file and often has a '.csv' extension. This format is a standard save-as type for Microsoft Excel. Usually, text fields are enclosed in quotes and numbers are not.
Rows of a comma-delimited file might look like this:
"Employee Name",1000.00,500.00,012345678,0,""",""
"Another Employee",2000.00,1500.00,012345678,0,"",""
To save a QuickFile compatible Excel spreadsheet in .csv format, refer to the information below.
Make sure the employee information for a single employer account is included in the spreadsheet.
Note: If this spreadsheet was created by a program like QuickBooks, follow the directions below to ensure the Excel spreadsheet is in .csv format.
- Remove all headers or footers. Only the actual employee data can be in the file.
- In Microsoft Excel, choose the Data tab and select Sort.
- Sort by Column B or C (whichever is empty on the header line).
- Choose No Header, Select OK.
- The lines to be deleted should be at the top of the list.
- After deleting these lines, you can re-sort your data if you desire.
- Format spreadsheet as text.
- Copy and paste the body of the spreadsheet into a new workbook to delete spreadsheet formulas.
- Remove blank rows between the data.
- Include only the employee name, Social Security number, and total wages for each employee. The name field can be in one column (QuickFile will allow you to separate the name field with the click of your mouse) or in two or three separate columns.
- Total wages entered must exactly match the total of employee wages in your comma-delimited file. Do not enter negative wages. You must adjust the quarter where the error/adjustment occurred.
- Save the file as an Excel spreadsheet in .csv format.
- From the menu, choose the File tab and select Save As.
- Select the directory where you want to save the file.
- Enter file name (if a change of name is desired) or use current name.
- Select CSV (Comma-delimited) (*.csv).
- Save the file.
When working with comma-delimited files, the QuickFile Comma-Delimited Import Program is used.
Select the comma-delimited data file containing the employee information created by your payroll software. Select the Find File button to open a window where you can navigate to locate your file. Highlight the file name, and press Select. The file-locator window will close. Then, if the file name in the upper box appears correct, press the Start button.
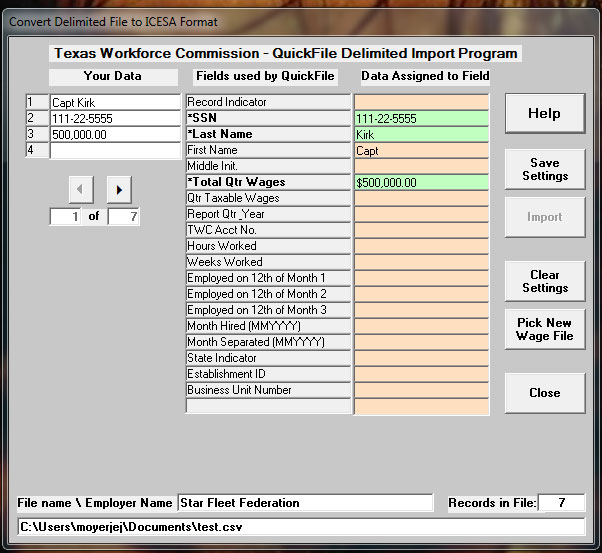
The next window will reveal three columns. Connect your data to the fields used by QuickFile, as described below.
Note: When you finish, scroll through the file to make sure everything lines up properly.
- Left column "Your Data" reads from your file. You can scroll through the file by pressing the arrow buttons at the bottom of the column.
- From the Center column "Fields used by QuickFile" select bolded description that matches one of your data fields. The description box will change to a salmon color.
- Click twice on your matching data in the left column. It will change from black on white to green on salmon, and the data will appear in the right-hand column labeled as Data Assigned to Field in a green box next to the description.
- Repeat this process until everything is defined.
- TWC requires a minimum of full last name and first initial for each employee. QuickFile will ask how to separate the names if the employee's first and last names are not in separate fields.
- Assign the name field to our required Last Name box. If the employee name is in a single field, you will be prompted for the format of the name, either "Last, First"; or "First Last". Select the correct format and press Save Settings again. Verify that the name is properly interpreted by scrolling through your data and observing the various name fields.
- Make sure that all employee names are in the same format. Be careful that you do not mix the formats (Last/First & First/Last).
Allowed formats are:- Firstname Lastname (separated by one or more spaces)
- Lastname, Firstname (separated by a comma)
- Firstname M Lastname (where M is the employee's middle initial)
- Lastname, Firstname M (Firstname separated by a comma, M by a space)
- Lastname, Firstname M. (same as above, with a period after M.)
- Firstname M. Lastname (where M, the middle initial, has a period after it)
- Firstname M. Lastname, Sr. [Jr.], [III], [IV] (comma required after Lastname)
- Lastname, Firstname M., Sr. [Jr.], [III], [IV] (comma required after middle-initial)
- Make sure that all employee names are in the same format. Be careful that you do not mix the formats (Last/First & First/Last).
- You must start over if you make a mistake. Select the Clear Settings button to erase the assignments and reset the screen.
- Select the Save Settings button so you do not have to do this again. (The settings will remain between filings until you change them.)
- Select the Import button to convert your data and begin the validation process. Refer to Validating the File section for more information.
Import Program Button Descriptions
Page buttons are as follows:
- Help: Selecting this button will display a series of brief help pages on how to use the form. Select OK to take you to the next screen. Select Cancel to stop the presentation.
- Save Settings: Selecting this button will save the assignments you have made. The information is saved into the QuickFile program directory, in a file named QF_import_specs.ini (for fixed-length) or QF_import_specs_d.ini (for comma-delimited).
- Import: Select this button once the necessary data areas have been associated with the QuickFile fields to start the conversion and edit processes.
- Clear Settings: Select this button to restart the process and to remove the current field assignments from memory. This is the only way to clear out an incorrect field assignment.
- Pick New Wage File (comma-delimited only): Select this button to redisplay the file selection box so that another file can be selected.
- Close: Select this button to close the form without taking any further action and to return to the previous menu.
You must validate your file to continue the filing process. We encourage you to validate the data as early as possible. You may consider submitting data using the Test option first, if you have not previously submitted a report via QuickFile.
Validating the File
QuickFile will not allow you to send the file to TWC if your quarterly report file has errors. You should not wait until the last day to submit tax reports, as unforeseen network problems or program errors may delay transmission and result in late report penalties. Allow adequate time to fix errors within your payroll program and reconstruct the payroll file so that it will pass the QuickFile edits, enabling you to file the return on time.
- Select the Validate button to validate data. This may take a few seconds or minutes, depending on the speed of your computer and the size of the payroll file. If you are importing MMREF-1 formatted data and either the employer’s TWC tax account number (00-000000-0), or the Quarter/Year are missing, QuickFile will display a pop-up window requesting you to input that information before the verification can proceed.
- A pop-up window will appear if data or format errors are found in the file. Data errors must be corrected before the file is sent. Format errors are for your information and require no action. This is explained in the error log that displays in the next step.
- Select OK or Yes, which will create a text file, VALIDATE.LOG and display any error information.
- The error information is displayed in a Notepad or WordPad window. This file is named VALIDATE.LOG and is in the QuickFile program directory. You can print this as a reference if you wish.
- Each time you validate a file, VALIDATE.LOG is replaced. If you wish to save the previous information you must choose File, Save As from the menu and change its name and/or location.
- If you close this log file but wish to view it again, select View and select Show Error Log.
Validation Errors
There are four types of errors: format, data, user, and program.
- Format errors are warnings that indicate some non-critical information is missing from or incorrect in your payroll file. Agency personnel may contact you later for more information if these errors are not corrected. Corrections to format errors should be made within your payroll program. A corrected payroll file should be created and QuickFile should then be restarted.
- Format errors in your payroll file will not prevent your payroll file from being processed and tax reports from being posted to your TWC employer account.
- Data errors indicate there is a critical error in the payroll file. To correct data errors, print the error log, return to your payroll program, correct the errors, and reconstruct your payroll file. Next, start or resume QuickFile, choose Find and Select File, then validate again. If you have questions about how to correct the errors in your payroll data, contact your payroll software company. File formats details may be found in the Choosing the File Type section of this guide.
- Data errors will prevent your payroll file from being processed and tax reports from being posted to your TWC employer account. Data errors must be corrected before you can proceed.
- User errors occur when the user keys the wrong information into a certain field or left it blank.
- Program errors occur when the payroll program itself does not report the data correctly for QuickFile. The payroll software company must fix this type of error. If selecting the "Other Text Format" to file a report, program errors must be corrected by the user within the Excel spread sheet before validation can occur.
Note: User errors can be corrected by the filer, while Program errors may require correction by the payroll software company. You will need to contact your payroll company for your software if you have specific questions concerning the operation of your payroll program. TWC personnel are not familiar with payroll programs and will not be able to answer your questions.
Troubleshooting Errors
The following information will help you identify troubleshoot specific error messages you may encounter during validation.
Runtime Error 13 – Type Mismatch
- Problem: Non-numeric data found in a numeric field or total wages entered on the employer information screen does not match employee total wages.
- Solution: If this occurs while using the Other File Type converters, this may be due to blank fields in the comma-delimited (.csv) data file. Verify that all the boxes are filled in before saving. Do not leave them blank. Enter a zero if appropriate. If total wages entered on the employee information screen are correct, check the wages file and remove the header/footer lines and any total lines. The only data accepted within this file is the employee name, Social Security number and employee total wages.
Runtime Error 52 – Bad File Name or Number
- Problem: Cannot locate the file.
- The file name is no longer valid. If it is on a network or remote drive, the system may not be able to interpret the name. You may need to copy it to your C: drive.
If you previously loaded an ICESA, MMREF or Other Text Format diskette (e.g., drive A:) you will get this error if there is no diskette in the A: drive. To remedy this, place a diskette in the drive and restart QuickFile. QuickFile remembers the location of the last ICESA, MMREF or Other Text Format file used.
Runtime Error 62 - Input Past End of File
- Problem: Unnecessary data located in file.
- Solution: Check payroll file by scrolling to the right of and below the payroll data for any unrequired data or characters in the payroll file. These must be removed before validation can occur.
Runtime Error 76 – Path Not Found
- Problem: The program is trying to save the error log to an invalid location.
- Solution: From the menu bar in the QuickFile program, select Option, Log Directory. Select a valid location to store the files generated by the QuickFile program. These are usually stored in the same directory as the QuickFile program but may be altered. If an invalid location is listed, the program will fail after the file verification process completes. This error can also occur when the program is installed in a network directory. If the program fails during the Continue process and the directions above fail to fix the problem, you should reinstall QuickFile in a local directory on your PC.
Once the data file has passed the validation process, you are ready to test your connection and transmit your file.
Test Connection Option
To verify your connection or determine how long your transfer may take, select the Test Connection button. Selecting this option will begin transmission of a test filing that will not be processed as an actual report to your TWC employer account.
Results of the test can be seen under the Test tab of your Submittal History Screen at the conclusion of the QuickFile process.
Continue Option
Once the data file has passed the validation process, you are ready to transmit. Selecting the Continue button will start a new instance of your Web browser opened to the QuickFile logon page.
Transmittal results can be seen under the Production tab of your Submitter History Screen at the conclusion of the QuickFile process. "Accepted" must be displayed as confirmation of a successful QuickFile Report. We suggest that you print the information as proof of timely filing of the report.
Definition of QuickFile Terms
- Employer Data: A payroll file created by an employer for TWC reporting purposes. The data can be used in both the test connection and production features of the QuickFile system.
- Test Connection: The process of entering employer data into QuickFile for transmission testing only. No information is processed to any TWC employer account.
- Continue (Send File): The process of entering employer data into QuickFile for processing to a TWC employer account.
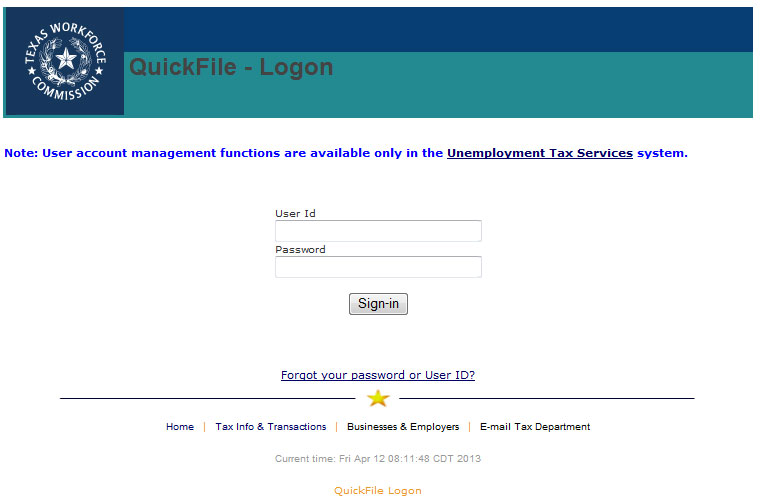
QuickFile Sign-in Process
You must have a User ID and Password to use QuickFile. Enter your TWC User ID and Password and select the Sign-in button. If you do not have a TWC User ID and Password, select the "Unemployment Tax Services" link. From the Unemployment Tax Services page, select the Sign Up for User ID quick link to create your User ID and Password.
QuickFile Sign-in Help
- Sign-in Error. Receiving the Authentication Failed error means that the User ID and password combination you entered is not valid. This message indicates that either the User ID or the password you entered is incorrect. Passwords are case sensitive and must be entered in the same case in which they were created. User IDs are not case sensitive. Once the problem has been resolved, restart the filing process.
- Not Authorized: You are not authorized to file TWC reports for the selected Employer ID.
- Passwords
- Expired Passwords. Due to the sensitive information protected by the User ID/password combination, users must change their passwords at least every six months. When a password expires, the system will notify the user at logon that they must establish a new password. If the password is changed before expiration, the password will expire six months from the date of the last successful change.
- Forgotten Passwords. Users can reset their passwords by performing the following steps:
- Select the Forgot Password or Forgot User ID link from the QuickFile - Logon Page.
- Select the Forgot Password link in the Quick Links box. Enter the User ID and Name.
- Enter the Security Answer.
- Enter and retype the new password.
- Self-Reset Password. If a user’s password has been revoked, they can reset it using the email address on record. After the third unsuccessful attempt at either logging on or answering the security question, the self-reset password process will be invoked. This is a three-step process. From the Reset Password page:
- Choose a new password and retype new password.
An email message will be sent to the email address on record. - Select the link provided in the message.
The emailed link takes the user to the Finish Password Reset page. - Enter their User ID and new password to finish the reset process.
Once the email is sent, the user has three calendar days from the day the email was sent to finish the password reset process. Once the email expires, the user will be required to restart the reset password process.
- Choose a new password and retype new password.
- Forgotten User IDs
Users can recall their User IDs by performing the following steps:- Select the Forgot your password or User ID link from the QuickFile - Logon Page.
- Select the Forgot User ID quick link.
- Enter your name and email address as registered with the Unemployment Tax Services system.
- Your User ID will display in the User ID field on the Unemployment Tax Services – Logon page.
Users must contact their local tax Office for further assistance if they receive any of the following errors: email address not found, invalid or has multiple users.
Upload Page 1 – Submit Authorization File
QuickFile creates a file from your validated payroll file and saves the Authorization File to your computer with a “.qfh” file extension. The file verifies your authority to file reports to the employer accounts to which you are attempting transmittal.
Select the Browse or Choose File (if using Chrome) button to navigate to C:/QuickFile/Upload/ and select the requested Authorization File from your computer.
Select the Send File button to continue filing via QuickFile once the requested Authorization File has been selected.
If your Authorization File conflicts with your TWC employer account, you will bypass the authorization verification and be taken directly to the final results of your QuickFile transmittal to view the specific error situation encountered.
Upload Page 2 - File Report
Once your Authorization File has been sent and shows Complete as described above, your ICESA report file is ready to be sent. The ICESA report file is your actual formatted report prepared for transmission.
The ICESA report file is named with an “ice.gz” extension, such as filename.ice.gz.
Select the Browse or Choose File (if using Chrome) button to navigate to C:\QuickFIle\Upload\ and select the requested ICESA report file from your computer.
Select the Send File button to continue filing via QuickFile once the requested ICESA report file has been selected.
Filing Errors
QuickFile will reject your file for any of the following reasons:
- Duplicate quarter: a report has already been filed for the quarter indicated.
- Not authorized: the user does not have ‘File Report’ authority for this account. You will need to contact the account administrator for the employer account and ask that they grant you the necessary permission.
- If more than one tax report is being submitted, they must all pass the validation process.
- If one or more of the tax reports do not pass the validation process, the entire file will be rejected.
- The user has the option to correct the errors or remove the incorrect tax reports from the file and resubmit those reports that do pass validation.
Status code "Report file not received":
- You did not send both the ".qfh" and the ".ice.gz" files.
- Something happened during the transmission process.
- Go back to QuickFile, revalidate, and resend both files.
Status code "Data passed from the PC is Null":
- You did not send either ".qfh" or ".ice.gz" file.
- Employer sent file without selecting file from C:\quickfile\upload\.
- Go back to QuickFile, revalidate, and resend both files.
Changes to a Submitted File
For any adjustments needed after the file has been uploaded:
- Submit through Unemployment Tax Services website using the Adjust Wage Report link.
- Submit a Form C-5 (adjustment report) and/or Form C-7 (wage list adjustment schedule). These adjustment reports are available on the Tax Forms and Instructions page.
Submitter & Account Inquiries
QuickFile does not provide a confirmation number after your report is sent.
From the QuickFile home page you can search for submitted or posted reports, and test connections.
- If you are the person who performed the file upload, select the upper Search button to see reports and tests recorded under your User ID. This will take you to the Submitter History page.
- If you want to see final report information on an account that you are authorized to view, you can enter the account number in the lower box and select the Search button to its right.
The Submitter History page allows you to see the results of all your filing activities. Only transmittals made under your current User ID login will be visible for your review.
From this page, users can access Test and Production transmittals and expand reports to show the status of each account submitted. This page also links directly to a listing of all Production activity for an account.
If your file transmission was successful, a status of "Accepted" or "Meets Requirements" confirms that the selected Employer ID has cleared all verifications. This will change to "Posted" once the information has been stored to your account, usually one to two business days. This is your confirmation of completion.
If the Employer ID listed already shows a report posted for this quarter, a status of “Duplicate Qtr” will display.
View & Print Your Quarterly Report
You can view and print your quarterly report after it has been submitted on QuickFile.
- Logon to your account via Unemployment Tax Services to view Wage Report History.
- After one business day, the summary report (Form C-3 information) is available.
- After two business days, the summary report (Form C-3 information) and wage report (Form C-4 information) are available.
- If report information is not available within three business days, submit a Contact Request. From the Employer menu, select:
- Reason for Contact: Employer Tax Account Actions/Issues
- Issue that you are having: QuickFile Support Requests
Submitter History – Status Conditions
Check the status of your transmittal by reviewing the information in the Status column.
- Posted: The previously accepted submission has been posted to the Texas Workforce Commission tax records by the TWC batch process. This is the final step.
- Accepted/Meets Requirements: A submission was accepted by QuickFile and reports for all TWC employer accounts in the payroll file transmitted have been processed. The status of each Employer ID within your transmittal will reflect ‘Meets Requirements’ if your QuickFile transmittal has been accepted.
- Rejected: A submission was rejected by QuickFile. Therefore, reports have not been processed for any of the TWC employer accounts in the original payroll file submitted; at least one individual account was rejected. Each TWC employer account in your payroll file must be accepted for any reports to be processed.
- Report file not received: Indicates the user failed to upload the Payroll File. Two files must be sent through QuickFile: first, the Authorization File (i.e., filename.qfh) and then the Payroll File (i.e., filename.ice.qz). Another cause for this status code could be an outside system occurrence corrupted the attempted QuickFile transmittal.
Check the status of your test transmittal by reviewing the information in the Status column.
- TEST OK: A test connection via QuickFile was successful. No reports have been processed to any TWC employer accounts. A new submission must be made to process reports to any TWC employer accounts. The Status of every Employer ID in your transmittal will reflect Meets Requirements when your QuickFile test connection shows Test OK.
- TEST FAILED: A test connection via QuickFile failed. No reports have been processed to any TWC employer accounts. The Status of every Employer ID within your transmittal must reflect Meets Requirements to have your QuickFile test connection show the status Test OK.
- TEST FAILED: No data file. All information transmitted in a test connection showed correct, but an outside system occurrence has corrupted your attempted QuickFile transmittal. The Status of every Employer ID in your transmittal will reflect Meets Requirements when your QuickFile test connection reflects TEST FAILED.
Submitter History Help
Tabs
- PRODUCTION: Select this tab to view the final results of your SEND transmittals.
- TEST: Select this tab to view the final results of your TEST SEND transmittals.
Links
- Date/Time Report Submitted: Select desired Date/Time Report Submitted data field to view Employer ID, Employer Name, Quarter, Year and Status information corresponding to a particular transmittal attempt.
- Employer ID: Select desired Employer ID data field to display a history of all QuickFile transmittal attempts made on the TWC employer account selected. Only Production transmittal attempts will be visible to you regardless of whether you have previously selected the Production or Test tab.
Fields on the Submission Line
- Date/Time Report Submitted: The date and time the report transfer was initiated.
- ICESA-Format Payroll File: The payroll file you started with on your computer.
- Uploaded Filename: The name of the converted and compressed file containing the report information.
- # of Accts: The number of Employer Accounts that were contained in the report.
- Status: The status of the transmission. Note: If any account verification failed, the entire submission is disallowed.
Fields on the Account Line
- Employer ID: The TWC account ID for the employer reporting wages in this report. Select this field to display a history of all QuickFile Production transmittal attempts made on this account. Only Production transmittal attempts will be visible to you regardless of whether you have previously selected the Production or Test tab. You will only be able to view accounts to which you have been given authorization.
- Employer Name: The name you associated with the Employer ID in your transmittal.
- Qtr or Year: The quarter and year of the report you have attempted to transmit for the selected Employer ID.
- Status: Gives the result of the TWC verification process for this particular item. Note: If any account verification failed, the entire submission is disallowed.
Once you have submitted your report, you are ready to submit your payment.
Payment Overview
Texas Workforce Commission (TWC) Rule 815.109 requires all employers to pay their quarterly Unemployment Insurance (UI) taxes electronically.
Employers, bookkeepers, accountants and service agents have several options for making unemployment tax payments:
- Automated Clearing House (ACH) Debit
- Credit card payments using American Express, Discover, MasterCard or Visa
- TEXNET EFT
For more information on payment options, visit Payment Options for Unemployment Tax.
This Texas Workforce Commission (TWC) End-User License Agreement (EULA) is a legal agreement between you (either an individual or a single entity) and TWC for the software program QuickFile ("QUICKFILE"). This agreement includes computer software and may include associated media, printed materials, and online or electronic documentation. By installing, copying, or otherwise using QuickFile, you agree to be bound by the terms of this EULA. If you do not agree to the terms of this EULA, do not install or use QuickFile.
QuickFile License
QuickFile is protected by copyright laws, as well as other intellectual property laws and treaties. The TWC makes QuickFile freely available for use by anyone (employers, accounting firms and others) who needs to submit quarterly unemployment tax reports to the TWC.
Grant of License
This EULA grants you the right to install and use any number of copies of QuickFile.
Other Rights & Limitations
- Limitations on Reverse Engineering, Decompilation, and Disassembly. You may not reverse engineer, decompile, or disassemble QuickFile, except and only to the extent that such activity is expressly permitted by applicable law notwithstanding this limitation.
- Support Services. TWC may provide you with limited support services related to QuickFile ("Support Services"). Use of Support Services is governed by the TWC policies and programs described in the user manual, in online documentation, and/or in other TWC-provided materials. Any supplemental software code provided to you as part of the Support Services shall be considered part of QuickFile and subject to the terms and conditions of this EULA. With respect to technical information you provide to TWC as part of the Support Services, TWC may use such information for its business purposes, including for product support and development. TWC will not utilize such technical information in a form that personally identifies you.
- Termination. Without prejudice to any other rights, TWC may terminate this EULA if you fail to comply with the terms and conditions of this EULA. In such event, you must destroy all copies of QuickFile and all of its component parts.
Upgrades
A QuickFile labeled as an upgrade replaces and/or supplements the product that formed the basis for your eligibility for the upgrade. You may use the resulting upgraded product only in accordance with the terms of this EULA.
Copyright
All title and copyrights in and to QuickFile (including but not limited to any images, photographs, animations, video, audio, music, text, and "applets" incorporated into QuickFile), the accompanying printed materials, and any copies of QuickFile are owned by TWC or its suppliers. QuickFile is protected by copyright laws and international treaty provisions. Therefore, you must treat QuickFile like any other copyrighted material except that you may install QuickFile on as many computers as needed for your operations. The printed materials accompanying QuickFile may be copied for use by your organization.
Dual-Media Software
You may receive QuickFile in more than one medium. You may use or install the other medium on another computer. You may not rent or lease copies of QuickFile to anyone else. Other interested parties are encouraged to obtain free copies of the current version from the TWC.
Miscellaneous
Should you have any questions concerning this EULA, or if you desire to contact TWC for any reason, please contact TWC.
Texas Workforce Commission - Tax Department
101 E 15th St
Austin, TX 78778
You may also submit a Contact Request. From the Employer menu, select:
- Reason for Contact: Employer Tax Account Actions/Issues
- Issue that you are having: QuickFile Support Requests
Limited Warranty
TWC warrants that (a) QuickFile will perform substantially in accordance with the accompanying written materials and (b) any Support Services provided by TWC shall be substantially as described in applicable written materials provided to you by TWC, and TWC support engineers will make reasonable efforts to solve any problem issues.
Customer Remedies
TWC’s entire liability and your exclusive remedy shall be repair or replacement of QuickFile that does not meet TWC's Limited Warranty. Any replacement QuickFile will be warranted the same way as the original.
No Other Warranties
To the maximum extent permitted by applicable law, TWC disclaims all other warranties and conditions, either express or implied, including, but not limited to, implied warranties of merchantability, fitness for a particular purpose, title, and non-infringement, with regard to QuickFile, and the provision of or failure to provide support services. This limited warranty gives you specific legal rights.
Limitation of Liability
To the maximum extent permitted by applicable law, in no event shall TWC be liable for any special, incidental, indirect, or consequential damages whatsoever (including, without limitation, damages for loss of business profits, business interruption, loss of business information, or any other pecuniary loss) arising out of the use of or inability to use QuickFile or the provision of or failure to provide support services, even if TWC has been advised of the possibility of such damages.